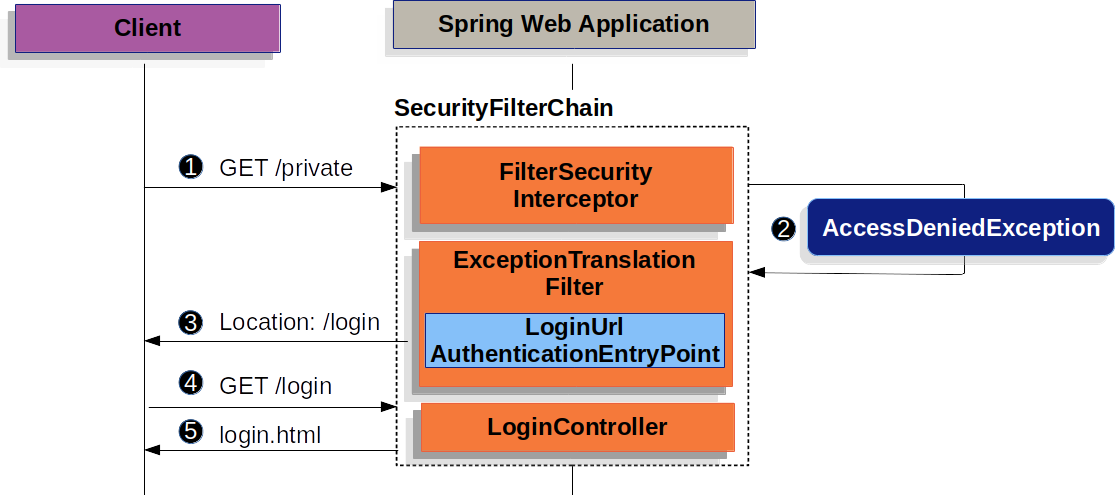
我们看到用户是如何被重定向到登录表单的。
上图建立在 SecurityFilterChain 图上。
首先,一个用户向其未被 授权的资源(/private)发出一个未经 认证的请求。
spring Security 的 AuthorizationFilter 通过抛出一个 AccessDeniedException 来表明未经 认证的请求被拒绝了。
由于用户没有被认证,ExceptionTranslationFilter 启动了 Start Authentication,并发送一个重定向到配置的 AuthenticationEntryPoint 的登录页面。在大多数情况下, AuthenticationEntryPoint 是 LoginUrlAuthenticationEntryPoint 的一个实例。
浏览器请求进入其被重定向的登录页面。应用程序中的某些东西,必须渲染登录页面。
当用户名和密码被提交后,UsernamePasswordAuthenticationFilter 会对用户名和密码进行 认证。UsernamePasswordAuthenticationFilter 扩展了 AbstractAuthenticationProcessingFilter,所以下面的图看起来应该很相似。
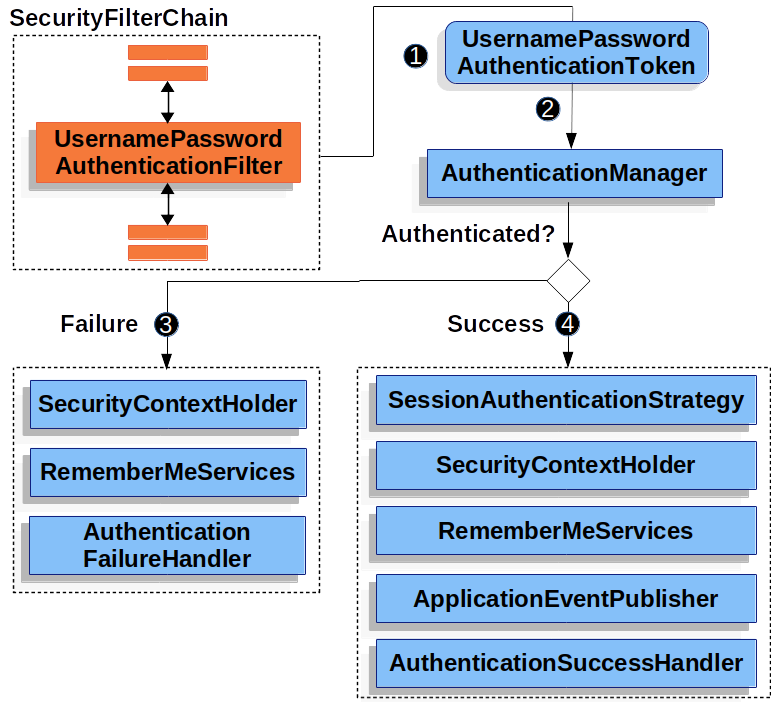
上图建立在 SecurityFilterChain 图上。
当用户提交他们的用户名和密码时,UsernamePasswordAuthenticationFilter 通过从 HttpServletRequest 实例中提取用户名和密码,创建一个 UsernamePasswordAuthenticationToken,这是一种 Authentication 类型。
接下来,UsernamePasswordAuthenticationToken 被传入 AuthenticationManager 实例,以进行 认证。AuthenticationManager 的细节取决于 用户信息的存储方式。
如果 认证失败,则为 Failure.
SecurityContextHolder 被清空。
RememberMeServices.loginFail 被调用。如果没有配置remember me,这就是一个无用功。参见Javadoc中的 RememberMeServices 接口。
AuthenticationFailureHandler 被调用。参见Javadoc中的 AuthenticationFailureHandler 类。
如果 认证成功,则 Success。
SessionAuthenticationStrategy 被通知有新的登录。参见Javadoc中的 SessionAuthenticationStrategy 接口。
Authentication 被设置在 SecurityContextHolder 上。参见 Javadoc 中的 SecurityContextPersistenceFilter 类。
RememberMeServices.loginSuccess 被调用。如果没有配置remember me,这就是一个无用功。参见Javadoc中的 RememberMeServices 接口。
ApplicationEventPublisher 发布 InteractiveAuthenticationSuccessEvent 事件。
AuthenticationSuccessHandler 被调用。通常,这是一个 SimpleUrlAuthenticationSuccessHandler,当我们重定向到登录页面时,它会重定向到由 ExceptionTranslationFilter 保存的请求。
默认情况下, Spring Security表单登录被启用。然而,只要提供任何基于Servlet的配置,就必须明确提供基于表单的登录。下面的例子显示了一个最小的、明确的Java配置。
1 | public SecurityFilterChain filterChain(HttpSecurity http) { |
Copied!
在前面的配置中, Spring Security渲染了一个默认的登录页面。大多数生产 应用需要一个自定义的登录表单。
下面的配置演示了如何提供一个自定义的登录表单。
1 | public SecurityFilterChain filterChain(HttpSecurity http) { |
Copied!
XML
1 | <http> |
Copied!ied!
当登录页面在 Spring Security配置中被指定时,你要负责渲染该页面。 下面的 Thymeleaf 模板产生一个符合 /login 的登录页面的HTML登录表单。
1 |
|
Copied!
关于默认的HTML表单,有几个关键点。
表单应该以 post 方法请求 /login。
该表单需要包含 CSRF Token,Thymeleaf 会 自动包含。
该表单应在一个名为 username 的参数中指定用户名。
表单应该在一个名为 password 的参数中指定密码。
如果发现名为 error 的HTTP参数,表明用户未能提供一个有效的用户名或密码。
如果发现名为 logout 的HTTP参数,表明用户已经成功注销。
许多用户除了定制登录页面外,并不需要更多的东西。然而,如果需要的话,你可以通过额外的配置来定制前面显示的一切。
如果你使用 Spring MVC,你需要一个控制器,将 GET /login 映射到我们创建的登录模板。下面的例子展示了一个最小的 LoginController。
LoginController
1 |
|
补充:实际应用中,我们可能采用前后端架构,或者自定义登录请求界面,这种情况下,我们只需要将登录请求与.loginProcessingUrl(“/login”)保持一致,还的注意请求类型,请求参数和请求方法
下面,就是一个简单的模拟登录请求
1 | import axios from 'axios'; |
这种情况只适用于springsecurity关闭了csrf验证,如果没关闭的要加上_csrf参数和值(但是springsecurity这个值是默认生成的,我们可以自定义生成csrf,然后存储起来,发送请求获取csrftoken)具体看csrf那章;